Picture this: a jar of vibrant, jewel-toned hot pepper jelly waiting to be spread on a warm cracker, the sweet and spicy aroma wafting through your kitchen. As you delve into this hot pepper jelly recipe, imagine the satisfying crunch of the peppers mingling with the smoothness of sugar and vinegar, creating a delightful dance of flavors that brightens any dish.

Have you ever experienced the joy of sharing homemade preserves with friends and family? This recipe is not only simple to follow but also incredibly rewarding, transforming fresh peppers into a sensational treat that sparks conversation and delight at every gathering. Stick around; you’ll want to make this again and again!
Why You'll Love This Recipe
- This hot pepper jelly recipe is not only easy to make, but it also bursts with vibrant flavors that will elevate any dish.
- The combination of spicy hot peppers and sweet red bell pepper creates a visually stunning jar of jelly that is as delicious as it is beautiful.
- Perfect for entertaining, this versatile condiment can be used on crackers, as a glaze for meats, or even in sandwiches.
- You’ll love how a simple recipe can bring warmth and excitement to your meals!
Now that you’re inspired to dive into flavor, let’s explore the essential steps to create your own hot pepper jelly masterpiece.
The first time I served my hot pepper jelly recipe, my friends’ eyes lit up with delight, and they couldn’t get enough of it on their crackers. That moment made all the effort worthwhile, turning a simple recipe into a cherished memory. Now, let’s dive into the preparation steps!
Essential Ingredients
To create the perfect hot pepper jelly recipe, you’ll need a balanced blend of ingredients to achieve that signature sweet and spicy flavor.
1 cup fresh hot peppers: Use a mix of jalapeños and habaneros for optimal heat; remember to remove the seeds if you prefer a milder jelly.
1 cup red bell pepper: This adds sweetness and color; finely chopping helps it blend seamlessly into the jelly.
1 cup apple cider vinegar: Preferably organic, this ingredient provides acidity that balances the sweetness of the sugar.
5 cups granulated sugar: Measure accurately to ensure proper gelling; this is crucial for the jelly’s texture.
1 package pectin (1.75 oz): Pectin is essential for achieving the right consistency; Sure-Jell works particularly well in this recipe.
1/2 teaspoon salt: A small amount of salt enhances the flavors and balances the overall sweetness of the jelly.
The full ingredients list, including measurements, is provided in the recipe card directly below.
Let’s Make It Together
Step 1: Prepare the Peppers:Start by washing the fresh hot peppers and red bell pepper thoroughly. The vibrant colors of the peppers will brighten your kitchen! Remove the stems and seeds from the hot peppers if you prefer a milder flavor, and finely chop all the peppers using a food processor or a sharp knife. You should have 1 cup of finely chopped hot peppers and 1 cup of red bell pepper when you’re done. A personal tip: wearing gloves while handling hot peppers can keep your hands protected from their heat!
Step 2: Combine Ingredients:In a medium saucepan, combine the chopped hot peppers, red bell pepper, apple cider vinegar, and salt. As you stir these ingredients together, inhale the sharp, tangy aroma that begins to fill the air! Place the saucepan over medium heat and bring the mixture to a boil, stirring occasionally. Keep an eye on it—the bubbling mixture is just starting to come together!
Step 3: Add Sugar and Pectin:Once boiling, add all 5 cups of granulated sugar at once into the pot. Stir continuously until the sugar is completely dissolved; this step is crucial for achieving that smooth jelly texture—aim for about 5 minutes. After it’s fully dissolved, bring the mixture back to a rolling boil. Now it’s time to add the package of pectin! Stir vigorously for 1-2 minutes as you watch the mixture thicken slightly; this ensures your jelly will set perfectly.
Step 4: Check the Consistency:Using a candy thermometer, check that your jelly reaches 220°F (104°C) for ideal gelling. If you don’t have a thermometer handy, perform the ‘plate test’: drop a small amount of jelly on a cold plate and let it sit for a minute. When you run your finger through it, if it holds its shape without running back together, it’s ready! Trust your instincts here—it’s one of those satisfying moments in cooking.
Step 5: Jar the Jelly:Remove the saucepan from heat and allow it to sit for about 5 minutes; this helps prevent all those beautiful pepper bits from floating to the top of your jelly. Grab your ladle and funnel, then carefully pour the hot jelly into sterilized canning jars, leaving about 1/4 inch of headspace at the top. Wipe down the rims with a clean cloth to ensure they seal properly before sealing with lids—this little touch makes all the difference!
Step 6: Process the Jars:Process those jars in a boiling water bath for about 5-10 minutes; this step is vital to ensure they are sealed correctly for preservation. As they bubble away in their bath, enjoy that feeling of accomplishment! After processing, remove them from the water bath and let them cool completely on a clean kitchen towel before checking their seals.
Now that we’ve crafted our delicious hot pepper jelly together, let’s dive into how to store and enjoy it!
Add Your Touch
Feel free to customize this hot pepper jelly recipe to match your taste preferences! Consider swapping in different varieties of hot peppers, like serranos or ghost peppers, for varying heat levels. You can also experiment with adding spices such as garlic powder or cumin for an extra flavor twist. If you enjoy fruity notes, toss in diced pineapple or mango to complement the heat. Don’t hesitate to explore these options—cooking is all about creativity and confidence in the kitchen! Next, let’s dive into the essential steps for making this delightful jelly.
Storing & Serving
To keep your hot pepper jelly recipe fresh and flavorful, store sealed jars in a cool, dark place for up to one year. For any unsealed jars, refrigerate and use within a few weeks. Serve the jelly chilled on crackers with cream cheese for a delightful appetizer, or use it as a glaze for meats to enhance their flavor profile.
Now that you have mastered the art of making hot pepper jelly, let’s explore some delicious ways to enjoy it!
Chef's Helpful Tips
- 1. When handling hot peppers, consider wearing gloves to protect your skin from irritation and avoid touching your face. This is especially important if you’re using habaneros, which can pack quite a punch!
- To ensure the sugar dissolves fully and prevents a grainy texture in your hot pepper jelly, stir continuously after adding it to the boiling mixture. Patience is key for achieving that smooth consistency!
- If you prefer a smoother jelly, blend the mixture before adding the pectin. This will create a more uniform texture without chunky pieces of peppers throughout, perfect for spreading on crackers or using as a glaze.
Now that you have some chef’s tips in mind, let’s explore creative ways to enjoy your homemade hot pepper jelly!
As I served my homemade hot pepper jelly at a family gathering, the delighted expressions on everyone’s faces reminded me of the joy that simple recipes can bring to our lives.
How to Know It’s Done Perfectly
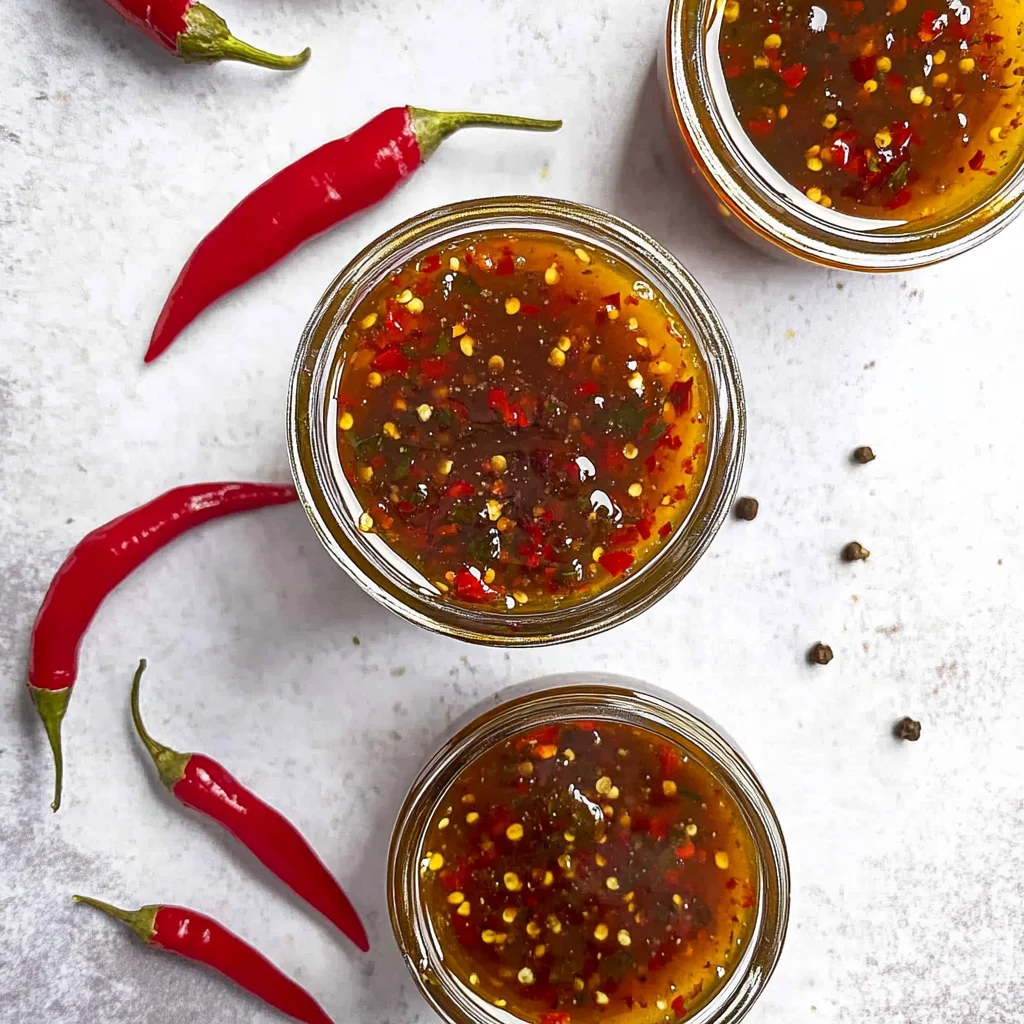
Your hot pepper jelly recipe is perfect when it reaches a vibrant, jewel-like color and has a slightly thickened consistency. It should feel smooth and glossy, with a tantalizing aroma of peppers and sweetness. A small taste will reveal a balanced heat that excites the palate—remember, slight variations are normal, so trust your instincts!
Now that you’re confident in your jelly’s doneness, let’s move on to the crucial step of jarring it properly.
FAQ
What type of peppers are best for this hot pepper jelly recipe?
For this hot pepper jelly recipe, a mix of jalapeños and habaneros is ideal to achieve the perfect balance of heat and flavor. You can adjust the ratio based on your heat preference.
Can I modify the amount of sugar in the hot pepper jelly recipe?
It’s important to measure 5 cups of granulated sugar accurately, as this ensures proper gelling. Reducing the sugar may affect the consistency and setting of the jelly.
How long does it take to make this hot pepper jelly recipe?
The total time for the hot pepper jelly recipe is approximately 45 minutes, which includes 15 minutes for preparation and 30 minutes for cooking.
How should I store my hot pepper jelly after making it?
After processing the jars, store sealed jars of hot pepper jelly in a cool, dark place. Make sure to refrigerate any unsealed jars and consume them within a few weeks.
What can I serve with hot pepper jelly?
Hot pepper jelly is incredibly versatile! It pairs wonderfully with cream cheese on crackers, serves as a glaze for meats, or can be used in sandwiches for an extra kick.
With these FAQs answered, you’re well on your way to creating your own delicious batch of hot pepper jelly!